To look up a word in Mac's dictionary, highlight the word and press the hotkey:
啟動Mac內建字典的快捷鍵:
[control] + [command ⌘] + [D]
To add a new Traditional Chinese-English dictionary for users in Taiwan or Hong Kong, refer to this:
「教學」Mac 內建字典安裝繁體英漢辭典
Sunday, March 12, 2017

Monday, January 30, 2017
Mac Technique: Save Photos from iPhone in a Mac folder with correct date and time information in
While directly dragging photos from a Mac's Photos app to a Finder folder, the date and time that the photos were taken cannot be preserved. Here is the solution to keep the correct date and time of photos:
1. Import photos from an iPhone using the Photos app on a Mac.
2. Select photos and select File -> Export -> Export Unmodified Original For ## Items...

3. Select the folder to export the files.
1. Import photos from an iPhone using the Photos app on a Mac.
2. Select photos and select File -> Export -> Export Unmodified Original For ## Items...

3. Select the folder to export the files.
Tuesday, January 17, 2017
Mac Technique: Steps to Create a Bootable macOS Installer on a USB drive
This post shows how to create a bootable USB drive for macOS Sierra installation. The USB drive was created with a MacBook Pro running OS X 10.8.5 (Mountain Lion), which was installed on a clean SSD by holding down the option key during the first boot after swapping the Mac's hard drive with the SSD.
The steps to create the bootable macOS USB installer are as below:
The original OS X version is Mountain Lion 10.8.5.

Go to the Mac's App Store and get the latest macOS.

Quit the macOS installer.

The installer may be found in the Applications folder of Finder:
Application\Install macOS Sierra

Open the terminal and type this command:
sudo /Applications/Install\ macOS\ Sierra.app/Contents/Resources/createinstallmedia --volume /Volumes/MyUSB/ --applicationpath /Applications/Install\ macOS\ Sierra.app/
For other paths for USB drive or Sierra.app or for installing other OS X versions, refer to Apple's official document: Create a bootable installer for macOS.

 Reference:
Create a bootable installer for macOS
The steps to create the bootable macOS USB installer are as below:
The original OS X version is Mountain Lion 10.8.5.
Go to the Mac's App Store and get the latest macOS.

Quit the macOS installer.

The installer may be found in the Applications folder of Finder:
Application\Install macOS Sierra

Open the terminal and type this command:
sudo /Applications/Install\ macOS\ Sierra.app/Contents/Resources/createinstallmedia --volume /Volumes/MyUSB/ --applicationpath /Applications/Install\ macOS\ Sierra.app/
For other paths for USB drive or Sierra.app or for installing other OS X versions, refer to Apple's official document: Create a bootable installer for macOS.
Now the USB drive has been successfully formatted as a bootable macOS installer.

Create a bootable installer for macOS
Monday, January 2, 2017
Mac Technique: Delete Key for Windows on Mac
To delete text or files in Windows installed on Mac, use:
[fn] + [delete]
Related Information:
The Mac OS X Delete Key: It Goes Both Ways
Mac Technique: How to install Windows Support Software without Boot Camp icon in Windows 10
[fn] + [delete]
Related Information:
The Mac OS X Delete Key: It Goes Both Ways
Mac Technique: How to install Windows Support Software without Boot Camp icon in Windows 10
Tuesday, November 8, 2016
Mac Technique: How to install Windows Support Software without Boot Camp icon in Windows 10
Recently I upgraded the OS of a MacBook Pro to macOS Sierra 10.12.1 and then install Windows 10 with Boot Camp Assistant (Applications->Utilities->Boot Camp Assistant). Windows was easily installed, but not the Windows drivers for Mac.
The "Open Boot Camp Help" option in macOS's Boot Camp Assistant says that Boot Camp icon/Boot Camp Control Panel is required for the configuration of hardware in Windows:

Unfortunately, I couldn't to find the Boot Camp icon/Boot Camp Control Panel in Windows. Without proper drivers installed in Win 10, the Wi-Fi function did not work. This is a really big problem!!
The "Open Boot Camp Help" option in macOS's Boot Camp Assistant says that Boot Camp icon/Boot Camp Control Panel is required for the configuration of hardware in Windows:

Unfortunately, I couldn't to find the Boot Camp icon/Boot Camp Control Panel in Windows. Without proper drivers installed in Win 10, the Wi-Fi function did not work. This is a really big problem!!
After searching for the solution for a couple of days, I found this:
No option to download windows support software for Bootcamp Assistant
So I followed it to select Boot Camp Assistant->Action->Download Windows support software:

It takes a while for the download.
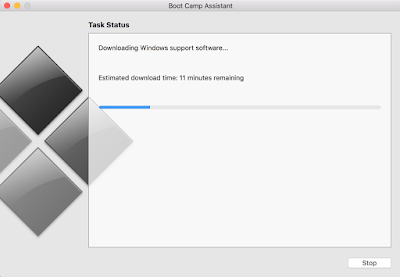
I store the Windows Support Software in a USB drive.
After booting in Windows, I simply select the Windows Support Software at USBDrive\WindowSupport\BootCamp\Setup and the drivers are then successfully installed. The Wi-Fi function then works normally.
The Apple Software Update also shows up automatically after installing the Windows drivers and rebooting Windows.
No option to download windows support software for Bootcamp Assistant
So I followed it to select Boot Camp Assistant->Action->Download Windows support software:

It takes a while for the download.

I store the Windows Support Software in a USB drive.
After booting in Windows, I simply select the Windows Support Software at USBDrive\WindowSupport\BootCamp\Setup and the drivers are then successfully installed. The Wi-Fi function then works normally.
The Apple Software Update also shows up automatically after installing the Windows drivers and rebooting Windows.
Saturday, November 5, 2016
Mac Technique: External keyboard configuration for Ctrl+C Copy hotkey
To use the windows style copy (Ctrl+C) or paste (Ctrl+V) hotkeys with an external USB keyboard connecting to a Mac, modify the keyboard settings as below:
Select System Preferences -> Keyboard -> Modifier Keys...
Make sure the USB keyboard is selected and modify the command and control keys as below:

Select System Preferences -> Keyboard -> Modifier Keys...
Make sure the USB keyboard is selected and modify the command and control keys as below:
Tuesday, October 11, 2016
Mac Technique: Refresh a network folder in Finder
[command] + [up]
then
[command] + [down] OR Click the network folder with a mouse.
then
[command] + [down] OR Click the network folder with a mouse.
Subscribe to:
Posts (Atom)